
Simple Does Not Mean Easy (formal upright)
- Peter Tea

- Oct 7, 2011
- 9 min read
Updated: Oct 8, 2020
The next tree that Mr. Tanaka had me work on was a formal upright Five Needle Pine (Goyomatsu). Now that the needles have hardened off, we can cut, wire, and style the tree. In this post, I will talk about what I did with this tree, basic concepts of what a formal upright is, Mr. Tanaka’s adjustments and of course, what I learned from the whole experience. There’s lots to talk about so lets get started.

Before I started, Mr. Tanaka told me to try and use as much of the branches that I can. He said that if I cut off too many branches, the needles will grow long the following year. I always knew that only cutting off what was necessary was the key, but I never applied it to the concept of needle length. I thought about it for a second and it all made sense. If the tree is feeding 100 branches and I cut off 50 branches, the tree is still going to try and feed 100 branches meaning that the left over 50 branches will get double the food now and the following year which leads to longer needles. (Did that make sense?)
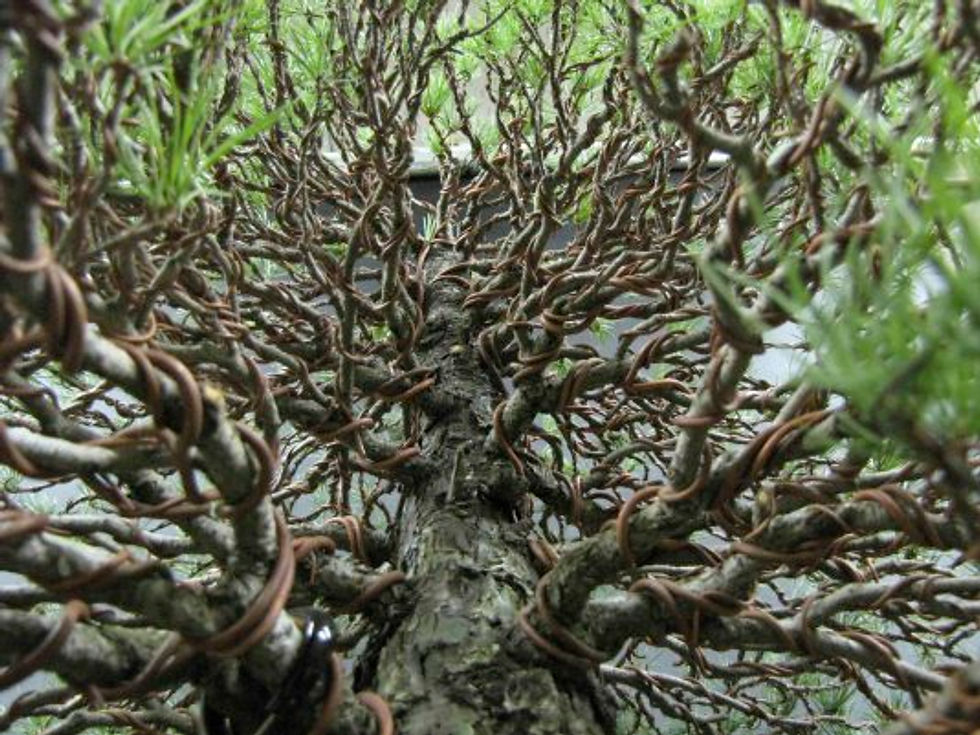
I sat there for awhile and looked at the tree trying to come up with a game plan. This was the first time that I’ve ever worked on a formal upright Five Needle Pine so I was a bit nervous. I thought back to all the pictures of formal uprights that I’ve seen in the past and use that as a template to what I was going to do with this tree. I laid out the copper wire and got to work. Mr. Tanaka then said that I needed to wire every branch. I looked at Mr. Tanaka and said, “no problem, I’ll have this tree done in no time.” Mr. Tanaka laughed and said, “good,” with a grin on his face. At the time, I thought he was just laughing at my joke, but as you will see as this post continues on, it was actually me that he was laughing at because this tree did not get done as fast as I thought it would.

The nebari (root spread) is pretty incredible and the tree had a nice fat trunk to go with it. The nebari was the same 360 of the tree. Some roots could have been cut to improve the look of the nebari but we left them alone at this point because we didn’t want to stress the tree anymore then we had to. I was going to wire and bend every branch on the tree, so I’m sure the tree wouldn’t be too happy if I started cutting some roots off at the same time. Mr. Tanaka then added that in the past, the trunk was much skinner. He says that Five Needle Pines can develop thick trunks even when they’re growing in a Bonsai pot. He says that the reason why I’m working on this tree now is because the trunk looks better and the tree will fetch a better price now.

I was 2 1/2 days into the tree and I only finished about 60 percent of it. I couldn’t believe how long this tree was taking me. I sat there staring at the tree at one point and Mr. Tanaka turned to me and said, “a lot of branches.” I nodded back and laughed. I felt kind of foolish because I thought I’d be done by now. I then told Mr. Tanaka that in the past I wired a larger Five Needle Pine and it only took me 3 days and that I had to spend time cutting off the old needles too! This tree already had that done for me! I couldn’t explain why this tree was taking me so long to complete.

I showed this picture to Mr. Tanaka and described the size and he explained to me why the tree I’m working on now was taking me so long to finish. Mr. Tanaka said that first off, the Five Needle Pine I’m working on now is a more fine growing tree meaning the branches are thinner and the needles are thinner. The pine I worked on in the past has a much denser thicker foliage and the branches are thicker too which makes it easier to wire. The other reason he gave me is that on formal upright trees, there are much more branches then an informal upright tree. Informal upright trees tend to have spaces here and there and branches are long and short. A formal upright has trees from top to bottom, 360 of the trunk. Mr. Tanaka says that all of these reasons is why this tree is taking me so long to finish. The explanation put me at ease and I continued the work.
What is formal upright?
Formal upright bonsais are one of the most difficult trees to grow and (I now know) are the most difficult to wire and style. Reason being is the rules for making a good formal upright is so stringent that if the style deviates from the rules, the tree starts to look funny. So what is a formal upright tree? A formal upright tree is a tree that is when the trunk is perfectly straight from bottom to top. The trunk also needs to have consistant taper from bottom to top. There should be branches all around the trunk and the spacing of the branches on the trunk is wide on the bottom and progressively gets closer as you move to the top of the tree. The shape of the canopy is almost a perfect triangle. There are other rules and acceptable deviations but those are the most basic rules. Essentially, we are trying to create a perfect tree. WOW! When was the last time anything was perfect? Mr. Tanaka said that formal upright trees are very artificial because no tree grows that perfect. Nevertheless, it is a style in Bonsai and that’s what I’m task to do on this tree… make it perfect or at least try to make it perfect. Simple… just follow the rules… easy? Not a chance….


Note on steel wire
Here at Aichien, we use both steel and stainless steel wire for guide wires. For the light bends, we normally use copper but sometimes there are bends that are so heavy that we need to use steel. If we don’t use steel, we would have to use a very large copper wire and there is a point where the copper is just too thick to use as a guide wire.
One thing I have noticed is that there is a big difference between the strengths of steel and stainless steel wire. Stainless steel won’t rust and it’s more then double the strength of regular steel wire, but stainless steel cost about five times more then regular steel. In this case, the bend wasn’t too bad but I used stainless steel anyways just because I wanted to get more practice with it. Since stainless steel is much harder, all aspects of applying it as a guide wire are more difficult. From looping it around a branch to twisting the two ends together, ever step is much harder to do.
If you do decided to try and use steel wire, be aware that if you apply enough pressure on the wire, the teeth on your pliers will start to flatten which will lead to premature wear of your tools.
Personally, I like stainless steel because it’s shiny… anyways…

I looked at the tree and suggested that the tree needs to be tilted to the right a little bit because the line of the trunk seems to angle to the left. Mr. Tanaka agreed and said that because the tree is pushing itself out of the pot, the line may have shifted since. After I set up a small block on the left side, the angle looked much better. This is one of the rare times where you actually want the trunk to have straight lines.
Mr. Tanaka then looked at the tree and said, “balance yoku-nai.” I blankly looked at him and figured that I had a 50/50 chance that he said the balance was either good or bad. Since I’m an apprentice I should have known better to think that I did it perfect on the first try. “Yoku,” means good and “nai,” means no. Put them together and it means, “no good.” Put that together with balance and it means the balance is no good. DOH!
Mr. Tanaka got to work on the tree and started making some adjustments. As he adjusted and I watched, I asked him some questions about what I did wrong and he explained them. About 30 percent into it, he looked at me and said, “try again.” Knowing some new info, I started to get to work to correct the wrongs I have done.


Here is a before and after to get a better view of the changes
What I observed, learned and did
1. As you can see, there is a block of wood under the left side of the pot (right side for you doctors) in the after photo. Just by adding that small piece of wood, the tree looks very straight. I was surprised to see in the after picture how much more powerful the tree looked when the trunk is perfectly straight and how unstable the tree looked in the before picture.
2. When Mr. Tanaka said that the balance was no good, he explained that all of the main branches coming out from the trunk needed to be the same angle as the key branch on the lower right side of the tree. He said that the angle of the key branch is the baseline for the angles of the other branches. The first thing I needed to fix was get all of the angles the same. I was disappointed because I learned this concept before but didn’t apply it correctly to this tree. I applied it to the last Black Pine I worked on but for some reason not on this tree. I will not forget next time.
3. When I bent all the branch down more and readjusted the branches, the tree became more compact and the trunk looked bigger.
4. Mr. Tanaka said that my pads were getting a little tight again and needed to spread them out some more. He then noted that if the pad is opened completely, the foliage can help hide some of the legginess of the branch when looking at the pads from the side. That’s new to me! I might have done it accidentally in the past but this is the first time it was explained to me that way. This was a big, “ah-ha,” moment for me.
5. If you looked at the before and after closely, you will find that some branches at the top of the tree are missing. Missing because they were cut off. Mr. Tanaka found an area at the top where there were five branches growing out of one level of the tree. People will sometimes refer to it as a, “whirl or a wheel spoke.” Mr. Tanaka says that if we use these branches, yes the tree will look fuller and nicer, but in the future, this area is just going to cause problems. Problems like overcrowding or even a bulge starting to develop at that point of the tree.

6. This tree re-enforced why I am here in Japan. After I finished the tree and took the picture, I was quite please with my work. Get the professional’s eye on the tree and the so called, good work, turned out to be no good at all or at least not as good as I thought it was.
7. I made it a point not to have any wires cross the front of the tree. All of the wires that anchored one branch to another all run in the back of the trunk. Sometimes I can get away with it and sometimes not. This time, I did and the tree looks so much better for it.
Future of the tree
So is this tree ready to show? If you said yes, you didn’t read my last post. Haha! Of course, the answer is no. There is way too much wire on this tree to show. Also, the tree needs to fill out some more. The pads should be fuller and the top definitely needs more branches. As the tree develops and the structure matures, the crown of the tree will become broader instead of pointy. Branches at the top of the tree that were bend down will start to lift themselves up as the tree grows. Mr. Tanaka says that the next time this tree will be wired is 5 years. The wire I put on it will probably stay on the tree for two or more years. The tree is old and the soil is compacted so the tree is going to grow at a much slower rate. I hope that I will be able to continue the work on this tree and develop it even more in the future, but who knows, it could be sold tomorrow. That’s just how it is in the Bonsai business, or at least a successful Bonsai business. Perhaps there’s something I can learn from that also…
This tree took me 5 days to finish… The good thing is that I got one under my belt and the next one should be much smoother.
What’s next???
Thanks for reading


Comments